
![]()
There are lots of good tools in the Free Open Source Software world for capturing and editing video, but common to making almost any movie is a basic understanding of the steps to building a good story using a storyboard editor. This article will help you take the very first step toward creating a movie by using the very simple storyboard video editing program called Kino to create a story.
Kino was born to tell stories
Creating even a short movie can become very complex very quickly, so it’s important to keep in mind what you are doing and how it all fits into the bigger picture of making your movie. Kino is a primarily a simple storyboard non-linear video editing program with some compositing capabilities, as opposed to tape-to-tape linear editing or more complex non-linear compositing software such as Cinelerra, The Open Movie Editor, or KDEnlive.
Before computers, movies were edited by actually cutting film tape. That process was called linear tape-to-tape editing. It required careful planning, because editing was destructive, since actual segments of tape were cut. It was “linear” because the inserted tape segments were literally attached to preceding and following segments to form a continuous whole.
Computers allow us to do non-destructive, non-linear editing. We can easily incorporate all kinds of music, still pictures, and video into a single movie. We can also separate out the video from the audio, and substitute still images or other video segments while the audio from the first track continues to roll over those newly added elements. Those new elements are called “assets” and the process of adding new elements is called “compositing.”
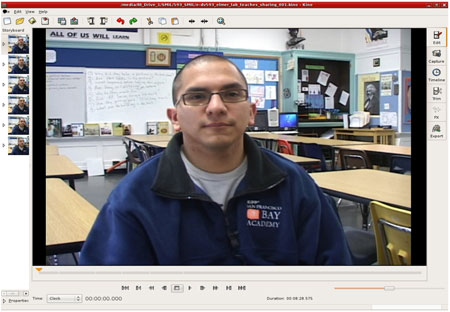
But newbies can become frustrated with complex compositing software, such as Final Cut Pro or Cinelerra or the Open Movie Editor because the user interface throws lots of options at the user, thereby confusing them. The advantage of starting out with Kino is that it has a very simple user interface. Here is a screenshot of the Kino interface (slightly modified by kSnapshot):
Kino’s simplicity allows you to develop the basic skills of putting together a story, so that you can later use a more complex tool such as Cinelerra or KDEnlive or the Open Movie Editor to add other assets, such as stills, transitions, music, and other video clips. Plus, compared with the hefty price tags of some of the non-Free applications like Final Cut Pro at $1,299.00 USD, Kino starts looking very inviting, indeed. At today’s prices for RAM and hard drives, you could build a monster rendering machine for the price of the non-Free video editors!
Kino has a few drawbacks. It will only accept .dv files. It is not suitable for adding lots of assets of different formats, and it has limited transition effects available. For those things you would use a more powerful compositor like Cinelerra or KDEnlive or The Open Movie Editor. But for speed and simplicity of building your story, Kino is hard to beat. The Digital Tipping Point crew has used Kino for sharing rough edits and all of our 1,229 five minute “source code” video posted to the Internet Archive’s Digital Tipping Point Video Collection has been rough-edited with Kino. Kino is capable of industrial work.
The purpose of this article is to walk newbies through the basic process of capturing and rough-editing your video to create a story using Kino.
How to capture your footage
Kino does not capture from USB, and so you will need to have access to a camera or tape deck that has IEEE 1394 (firewire). Most cameras and tape decks have 1394 ports. For the Digital Tipping Point film, I am using a “prosumer” Sony PD-170 camera that initially cost about $4,500.00 and a Sony DSR-45 tape deck that cost a similar amount; but I have also captured video from a cheap consumer camera by Canon that cost less than $300.00 USD. I am using Ubuntu Hardy, but I have used Ubuntu Gutsy and Fiesty with equal success, as well as openSUSE 10 and higher. In each case, the procedure was the same for capturing video, and it was dirt simple, either using Kino or the command line.
Kino is a wrapper for dvgrab when it comes to capturing video. To start the capture, simply connect your camera or tape deck via the 1394 cable. If you are using a camera, make sure that the camera is turned on and is in VCR mode (as opposed to camera mode).
Start Kino either by mousing to it or by typing kino at the shell prompt. You will be presented with Kino’s default screen, which is similar to the first screenshot above, except without the picture of the teacher or the thumbnails. On the far hand side of your Kino screen, you will see tabs for various functions. Click on the capture icon:
![]()
You will now be presented with Kino’s capture window. It will be black in the middle, with VTR (video tape recorder) buttons below the black window that will allow you to do the following: turn VTR control of the attached camera or tape deck on or off (the AV/C button); start video capture (the capture button, whose red light will illuminate when you click it to start capture); stop video capture by clicking the “stop” button; capture a still image by clicking the “still” button; and mute the sound during capture by clicking the “mute” button (not recommended, as it is much easier to strip sound out later than add it later).

Once you have turned on VTR control of your camera or tape deck, look near the bottom center of your screen, and you will see the typical icons to control the tape in the machine!
Those buttons will, in order, allow you to do the following: play; pause; rewind; fast forward the tape; move to tape; move to the start of the scene; or move to the previous frame, next frame, or the end of the video. Hovering your mouse over those buttons will, of course, give you a clue as to their purpose.
Before clicking the “capture” button, be sure to type in a valid path for storing the video as it is captured. Type the path name in the field labeled “File” just below the “capture” button.
By default, dvgrab, running under Kino’s GUI, will chunk out your video capture into 1 GB files for every 4.51 minutes of video. Those are huge video files, do plan your file storage accordingly!
If you so desire, you can also capture video from the BASH command line with this command under Ubuntu:
$ sudo dvgrab –format raw [filename]
Choose your path carefully
There is an art to choosing a path for saving your video! Kino offers you the option of saving your work as XML files as you edit, and I highly recommend that you do so. Saving your work as XML files will open up a whole new world of potential collaboration with others on your team, as long as they have the same original video and the same relative path. Think about the best method for saving your XML files. Do you want them in a separate directory from the raw .dv files Kino will produce, or do you want them in a separate directory?
For the Digital Tipping Point project, we are creating and saving four types of files, and I would recommend that you do the same thing if you have adequate hard drive space, due to the large amount of time and processing power consumed by rendering and compressing video. We save four types of video files: the orignal captured .dv files; the rough-edited .dv files; the .kino files; and the compressed video files, which are each stored in separate paths, respectively:
/home/username/capturedDV
/home/username/editedDV
/home/username/SMIL
/home/username/transcodedMPG_OGG
Unless you know that you are going to toss your work shortly after creating it, you will want to save yourself the time of re-rendering and recompressing work by saving each of the steps of your work. With the magic of XML, you can tuck away your edits in XML files and instantly call up your past edits, or your colleagues’ edits, simply by clicking on the files in Konqueror or Nautilus and opening them with Kino. This is a huge time saver, as a uniform system allows you to automate the process of rendering and compressing video.
You will also appreciate an orderly file structure as you get deeper into your editing, because you will make lots and lots of revisions, and you will want to know where you stored your work. The beauty of XML means that you will be able to mix and match your work without consuming endless gobs of hard drive space with unnecessary rendering of edits that could be saved in these tiny XML files.
The Kino GUI’s main features
The Kino GUI is almost self-explanatory for creating a storyboard of your video, but a newbie will appreciate some tips. After capturing your video, load it by clicking the familiar “open” icon in the upper right hand corner, or by clicking File > Open. (Note that if you already have a video loaded in Kino, clicking open will cause Kino to dump your current video file. More on this later).
Once you have opened your video, you will notice that a thumbnail appears on the left hand side of Kino window. Note that the bar dividing the main kino window will allow you to shrink the main Window so that you can get more information on the thumbnails, such as the paths and file sizes for those thumbnails.
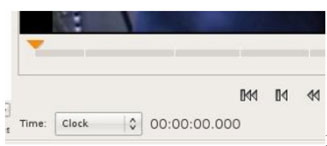
Kino’s GUI is smartly and simply structured around the editing of “scenes.” When you load a single video file, you will probably have only one “scene” in the file, depending on how you shot the video in that file. Below the main Kino window is a time line with a triangular arrow indicating where you are in the video. On my Ubuntu screen, pictured below, the triangle is orange. By grabbing this triangle with your mouse, you can quickly advance through the entire video file.
Below the time line is the now familiar VTR menu of buttons for playing, rewinding, and fast-forwarding the video. Below the VTR menu, from left to right, are the following: the properties menu, which gives you a read-out of the size and format of your file; a clock, which allows you to monitor your video in frames or a variety of time formats (I switch back and forth between the “clock” setting and the “frames” setting, depending on my needs.) To the right of the clock setting is the duration read-out, which will give you the total time of your video.
The secret is creating scenes
Kino is great because its GUI quickly and easily lets you separate one scene from another, so that you can re-arrange those scenes to create a story. Click on the “Edit” tab on the far right hand side of your Kino Window to make sure you are using the most simple of the two Kino editing interfaces. The other interface, the “Trim” tab, allows you more detailed control, but it is also more confusing for new users.
After clicking on the “Edit” tab, look at the the top center of your Kino window for two icons which look like | symbols with arrows point toward and away from the | symbol. Those are your primary tools for creating scenes in Kino:

By hovering your mouse over these arrows, you will see that these buttons allow you to separate scenes and merge a scene to a following scene or scenes. As you separate scenes, thumbnails appear on the left of your screen; as you merge them, the thumbnails disappear. Likewise, as you create scenes, a white break will appear on the timeline, as shown in the screenshot above of the orange triangle.
If you want to add more video, you will need to look in the upper left hand side of your icon bar for these icons, called the Insert Before and Insert After icons, respectively. Clicking on those icons lets you insert new video before or after the “current scene.” The current scene is also highlighted in the thumbnails section to the left of your screen.
![]()
Watch your video, and take notes!
Create your story by watching your footage in Kino and then taking detailed notes on the start and stop times of footage that is interesting to you. Write it out on a separate piece of paper or on a word processing program on your notebook as you watch Kino on your desktop machine. Re-arrange your notes to create the outlines of your story, and then use those notes as the guideline for moving your thumbnails around by dragging, dropping, and deleting scenes with your mouse. You can map your keyboard to do most of this work, but in the beginning, you will want to depend heavily on your mouse, because it is such an intuitive way of controlling the Kino interface.
Special effects come second!
Kino will allow you to add music and create special effects such as adding music or fading your audio levels up or down, or creating transitions such as wipes, dissolves, or by pixelating or zooming your video, but don’t make the mistake of getting caught up in tricks before you have a story. Audiences are now fatigued with special effects. They have seen it all and so they are jaded.
The runaway success of “Slumdog Millionaire” in the March 2009 Academy Awards shows that audiences expect a good story line. By contrast even a great special effects movie like “Batman: The Dark Knight” succeeded not so much because of the special effects, which audiences expected and took for granted, but rather because the story of Keith Ledger’s Joker character was so compelling. By spending time with ordinary pencil and paper and the simple storyboard editing GUI of Kino, you can lay a good foundation to tell a story which will move your audiences.
by Christian Einfeldt, Producer
Pingback: The Best Worldlabel Blog Posts from 2009 | WorldLabel
Fine.
Thanks for this post.
Nice article, Kino just saved my day allowing me to download old DV videos from my Handycam on Fedora 13 ~:-)
One suggestion to your articles, try to mention the date of the review or at least the version of the software for future reference. I just read it today 2010-07-09 and I assume the article was written on around December 2009. Great article, Thanks!
An excellent product. Fast, stable and easy to use. A must have for anyone with a DV camcorder and GNU/Linux. Excellent choice of output formats too I can not praise Kino enough!
Call me crazy, but I’m really starting to dig Kino. I’ve been aware of it for some time, and for some reason–probably a miscommunication on the developers’ part, and the persistent belief that it’s *just* for clip editing–I’ve always stayed away from it.
Now, after giving it a try, I see how intuitive editing video with it becomes.
I know you assert that it can be used for industrial (or professional) level work, but I’ve yet to see anyone else make/support this claim.
Are there any examples of people using Kino professionally?
Very well written post. Kino is the editor of choice for http://www.einfospot.com.
HI IAM SUNIL SANGHEE. PLEASE, GIVEME INFORMATION OF KINO INTALLING.
What is your favorite way to send large sized video in original quality to someone?
1. youtube, 2. ftp, 3. binfer, 4. snail mail.