MyPaint is a lightweight, easy-to-use open source painting application that you might not have heard of before. Unlike some of the more mature open source raster-graphics applications (such as Krita or Gimp), MyPaint doesn’t try to do everything: it’s not a photo editor, it doesn’t bother with paths, geometric shapes, text manipulation, or fancy masking options. Instead, it focuses on one and only one use: painting.
By Nathan Willis
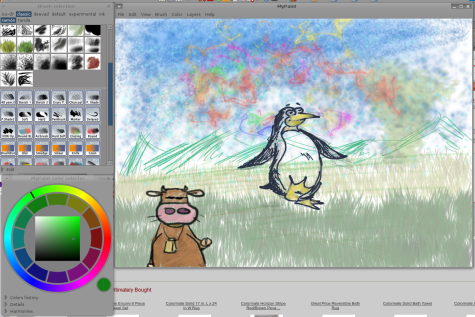
“MyPaint’s default interface, which make the canvas prominent and takes up as little space as possible for the tools. You can click on a new brush or a color from the palette with the pen stylus.”
MyPaint is built around use with pressure-sensitive graphics tablets, and puts natural-media-simulation first. There is only one “tool” per se, the paintbrush with which you draw directly onto the image. However, you can choose from dozens of different profiles with which to use that brush, simulating everything from charcoal to pencil, to ink to watercolor. Each has a different behavior, including the way it responds to pressure, speed, changes in direction, and interacting with pixels already on the canvas.
Get it and get started
Windows binaries and source code are provided at the MyPaint Web site, while a wiki page maintains up-to-date packaging information for the major Linux distributions and Mac OS X. Several distros include MyPaint in their package-management systems, including Debian, Mandriva, Arch Linux, and the development versions of Ubuntu and Fedora. Unofficial packages are linked to for the current versions of distros that do not currently provide MyPaint, so almost everyone should be able to install it without trouble.
You can use MyPaint with a mouse or other pointing device, but to really take advantage of it, you should use a graphics tablet from Wacom or another popular manufacturer. The pressure and tilt sensitivity is provided via XInput, so no special configuration is required if you are running an up-to-date distro.
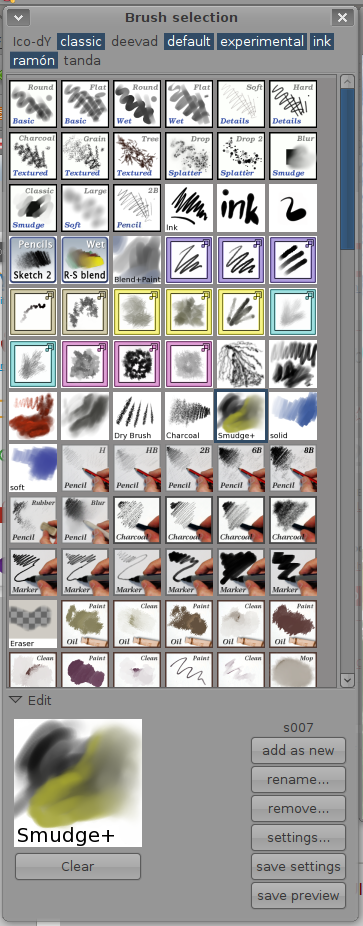
When you launch MyPaint, the painting canvas is blank. There are just two auxiliary windows, the brush selector and the color selector. The brush selector displays a grid of the installed brushes; to switch between them just click. The available brushes are divided into groups, with the group names along the top of the window. Clicking on a group name toggles its visibility, so if you want to work only with the “ink” brush set, you can the other choices. Each brush’s icon displays a small preview of the effect it generates. A special “eraser” brush is one of the options, and as is common in painting programs, is the brush automatically associated with the “eraser end” of the tablet’s pen.
“The brush selection palette, which can activate or deactivate “sets” of brushes as a group. The preview shows you a sample of the brush effect, and the buttons allow you to open the advanced settings.”
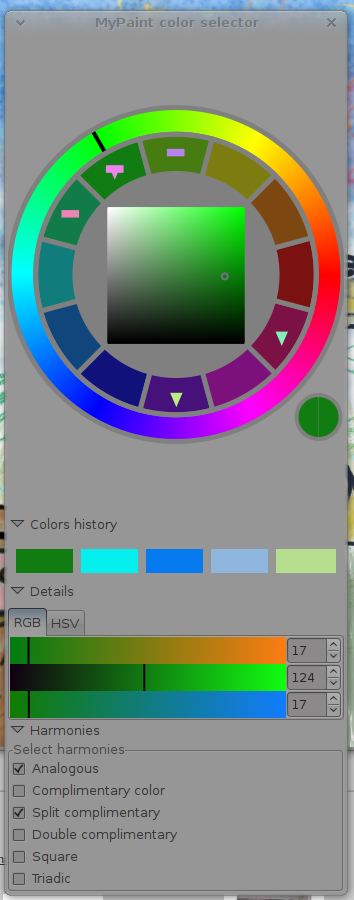
The color selector works like an artist’s palette; click anywhere on it and the active color is changed. The design features an innovative multi-level color-wheel with several options for switching between hues, saturations, and values. Recently selected colors are shown in a strip of palettes below the wheel, as is a fully-adjustable RGB / HSV selector for when you need to numerically match a specific shade. The selector wheel can optionally highlight complementary, analogous, and harmonious colors to the current color.
“MyPaint’s color selector, which uses a color-wheel, palette-like design by default, but can show you precise RGB values as well as mark important color combinations like analagous and complementary colors.”
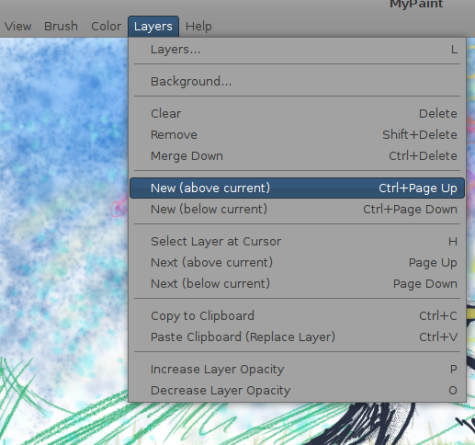
Although little else is visible in MyPaint’s interface, there are plenty of additional features — hidden out of the way. The canvas, for example, appears to be a fixed size, but you can grab any edge of the window and extend it, or hold down the middle mouse button and drag the canvas in any direction to get more room. You are working on a single painting layer by default, but you can add more layers (in any order) from the Layers menu, as well as adjust their relative opacity and add a textured background layer to simulate paper or canvas.
“MyPaint does not have a layers window, but you can create multiple layers in your painting, adjust their order, and change their opacity — including with keystroke commands.”
Similarly, you can change the diameter of the current brush and its opacity from the Brush menu. Finally, you can zoom the entire painting in or out, and rotate the canvas at will from the View menu. Keyboard shortcuts make all of these operations possible with one hand while you continue to paint with the pen in the other.
Customize it
Despite the fact that dozens of brushes are available in MyPaint, you may still decide that the way a particular brush behaves isn’t quite the way you’d prefer for it to. MyPaint allows you to customize the behavior of any brush, regardless of its origin. If you click on the “Edit” button at the bottom of the brush selection window, a new pane slides into view, showing a miniature “preview canvas” and a table of save/rename/remove buttons.
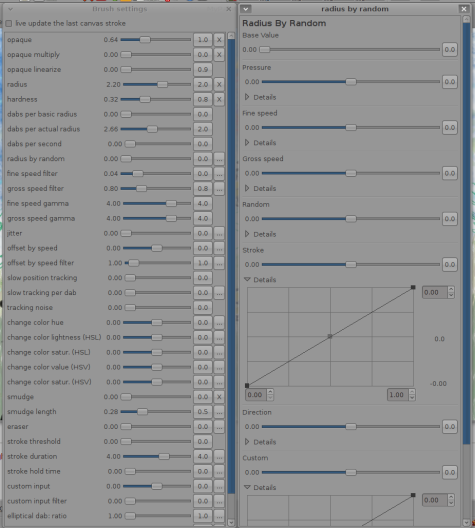
Clicking on the settings button in this pane opens the brush settings adjustment dialog for the current brush. MyPaint defines brushes by 35 different behavior factors — everything from basic radius and hardness all the way to custom filters, and everything in between. You can change any of these settings, test it in the preview window or send a “live preview” to the main canvas in order to see how it affects your drawing, and save the result if you like the results. That allows you not only to create your own brush set, but to alter existing brushes to better fit the way you work.
“MyPaint’s brush settings dialog (left), and advanced adjustment window (right). You can adjust 35 individual behaviors for a brush, and on most, tweak the settings down to the response curve of the graphics tablet hardware.”
That many brush options can look intimidating, but MyPaint provides mouse-over tooltips that explain each one. The basic and dimensional factors or the brush come first: radius, opacity, and hardness. MyPaint allows a brush not only to paint, but to alter the painting beneath it, so there are settings to adjust “opaque multiply” and “change color” factors to control the effects of the brush, as well as “smudge” factors and “eraser” behavior.
Brushes can also react differently based on the speed of the stroke, so several speed filter settings are provided. You can control the amount of stylus pressure required to begin a stroke, and separately control how much pressure is required to continue drawing. To simulate natural-media behavior, there are several “random” factors under your control: jitter, radius adjustments, and tracking “noise.” Each brush can also produce multiple “dabs,” and you can control how many, their spacing, and how they are affected by stylus speed. Finally, you can create a “custom input” parameter that reacts in a manner you define to the basic stylus input values (pressure, speed, direction, stroke length, etc.).
For each setting you want to change, you can adjust a slider that changes the brush’s value on whatever scale is appropriate. For many of the settings, you can also click on the “…” button to open an advanced settings dialog, where you can change the base setting with adjustments specific to the individual stylus input values mentioned above. Not all brush settings interact with these values (such as “dabs per second,” for example), so the “…” button is not available for every setting, but the overall level of control is quite detailed. In fact, the advanced settings window lets you apply an adjustment curve, not just a numeric factor, so you can create brush effects that respond in dynamic ways that vary by the pressure or speed of the stroke.
Many of the advanced brushes provided with MyPaint make good use of these advanced brush dynamics, so if you are interested in starting out as a brush designer, it is worth your time to examine the brushes, pens, and other tools designed by your fellow artists.
Saving and exporting your work
MyPaint’s native file format is OpenRaster, a relatively new format created by the open source community to serve as a good go-between for when artists need to exchange work between different applications. OpenRaster does not preserve high-end features that a full-featured editor like the Gimp might need — such as paths, filters, and masks — but it supports everything that a MyPaint painting needs: multiple layers, alpha-transparency, etc. Rather than create an entirely new format, MyPaint developer Martin Renold decided to use an existing one.
That means that you can save a “scrap” (as MyPaint refers to them) as an OpenRaster .ora file, then open it up in the Gimp or another program to do additional non-painting work. But you can also export your creation directly to JPEG or PNG format — with the option of a solid or transparent PNG background, or even exporting separate layers as separate files.
When it comes to creating images for use in your own designs, MyPaint is not a one-stop-solution: you may need a tool that handles filters, photo color correction, text, and geometric drawing tools, such as the Gimp, to create a complex design. But for what MyPaint does offer, pure natural painting simulation, it is the better choice. You have fewer options to get in your way, and can make brushing and inking your only concern.
BY NATHAN WILLIS

Pingback: Links 3/4/2010: Wine 1.1.42, SimplyMepis 8.5 Reviewed | Techrights
Pingback: Enhance Creativity using MyPaint » robbychen.com Blog
Thanks for the review. I put it on a Toshiba Satellite R15 running Ubuntu 9.10 (Karmic Koala). It is a laptop that converts to a tablet by rotating and flipping the screen. It has a pressure-sensitive display and stylus and works well with MyPaint. The user really likes it.