In spite of Silicon Valley’s best efforts, it is still not a paperless world. On a free software desktop, this is rarely a problem, because significant work has gone into making CUPS, Foomatic, and other parts of the printing tool chain work well and integrate seamlessly into the application suite — at least, for the typical “office” document. There are still a few things the average user can do to enhance the quality of prints from graphics applications like GIMP. Some are common to all raster image editors but which you might need a refresher course on, and some of which are more specialized. Given the price of high-quality inks and photo paper, though, a little preparation can save both time and money.
By Nathan Willis
Pre-flight check: accounting for how raster images work
An image undergoes multiple transformation between the time is read from the hard disk and the time it pops out of the printer. Most importantly, of course, that includes the editing that you perform in GIMP. A critical component to getting consistently good prints in enabling and configuring GIMP’s color management (CM). CM is built-in to all recent GIMP releases, but it does not come pre-configured, so if you don’t take the time to set it up, it does you no good.
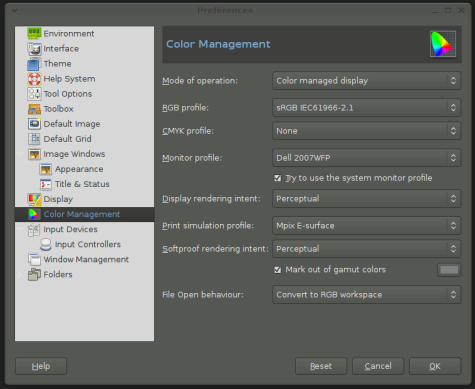
“GIMP’s color management settings, where assigning color profiles allows you to accurately preview printouts.”
Open the Preferences dialog (found in Edit -> Preferences), and click on the Color Management tab. Set the “Mode of operation:” selector to “Color managed display.” Beneath this is a list of other preference selectors. Even though we are discussing printing, you need to select an “RGB profile” and a “Monitor profile” in addition to a “Print simulation profile.”
Monitors are RGB devices, but they all differ slightly in terms of their exact hues, white points, and contrast. The best monitor profile you can use for accuracy’s sake is a custom profile generated with a tool like Argyll or LProf. If you don’t have a colorimeter to measure your display, though, a decent substitute is a profile specific to the brand and model of monitor you use. You can often find these on the driver discs that accompany a retail box, or on the manufacturer’s support Web site.
The selector labeled “RGB profile” is the “working profile” that GIMP will use with open files; in other words, it is the base from which other conversions will be made. Most people choose a generic, well-established profile like sRGB or AdobeRGB for this option; your Linux distribution may come with several options stored in /usr/share/color/icc/.
Ironically, it is because sRGB is regarded as the “Web-safe” profile that most people notice few color-management problems when all they do is edit images to post online. It is when they get to printing that the difference becomes distinct. Like your monitor, you must select a “Print simulation profile” for the specific output device you intend to use. Here, too, a custom profile is best, but at the very least, you should install one provided by the manufacturer. It may not be perfect, but at least it will have the right approximate white points, primaries, and so forth.
Both of the “rendering intent” selectors offer multiple choices. Some graphics pros have strong feelings about workflow and rendering intent; if in doubt, choose “Perceptual.” With all these settings in place, GIMP can now map generic RGB pixels to your monitor and simulate the output on your printer, allowing you to “soft-proof” your work without risking paper. When doing this, it is an extremely good idea to check the “show out-of-gamut colors” preference — this will warn you if your image strays beyond the printable color range of your output device. Nobody likes that kind of surprise.
Beyond the color management, it is important to correctly prepare your image for output. Begin by “flattening” the image with Image -> Flatten Image. This eliminates extra layers, producing a smaller file, so you may want to save this output copy under a different filename. Just as importantly, this action renders any text in the image, saving you from the potential difficulty of embedding fonts or trying to manage font collections between different devices.
Next you should calculate the correct size of the image, and resize it to the exact pixel dimensions. You can use the Image -> Scale Image … dialog. Here you have to be conscious of the difference between “dots per inch” (DPI) as often quoted on printer specs and “pixels per inch” (PPI). PPI counts the actual grid of image data, in RGB triples. DPI counts the droplets of ink actually fired out of the printer; the DPI count will always be much higher, because the printer blends colors by mixing multiple dots together to match the color of each pixel.
Take the final dimensions you want your printed output to be, and multiply by 300 PPI to get the correct size of the digital image. Unless you know otherwise for a specific printer, 300 PPI is what most printers can handle. GIMP includes three interpolation algorithms in the “Quality” section of the Scale Image dialog: Linear, Cubic, and Sinc (Lanczos3). Generally speaking, Sinc is regarded as the best, but it would not hurt to try Cubic if Sinc gives you artifacts. There are occasionally images where one works better than another, depending on whether it is photo, line art, or another image type.
Saving your output image at a particular pixel size helps because the printing stack does not have to resize the image for its final output: this means less memory is used, and the printout moves considerably faster.
Finally, developer Pascal de Bruijn recommends using a small amount of “over-sharpening” when printing raster graphics, to correct for ink bleed. Whether you find this to be useful might depend on your device, as would the amount of sharpening to perform, but it is worth considering and, if you have time to run a test, comparing with real-world printouts.
Much of the advice given here applies to other raster editing programs, such as Krita or one of the raw photo converters, with the added caveat that in those programs, you also need to be sure to save the print-ready version of your file in 8-bit-per-channel color. It is always a good idea to edit in 16-bit mode if possible, to preserve detail, but printing is generally an 8-bit process. GIMP is adding more and more 16-bit operations as time goes by, of course, so in future releases this may become a factor for GIMP printers as well.
The Linux printing tool chain in all its glory
In addition to the image file format itself, it is important to understand that raster images take a very different path through the printing tool chain that do text-centric documents. The LinuxPrinting.org site has a block diagram showing how most of the pieces actually fit together, but because it is an “ASCII art” drawing, you might prefer to look at the SVG copy recreated for Wikimedia Commons.
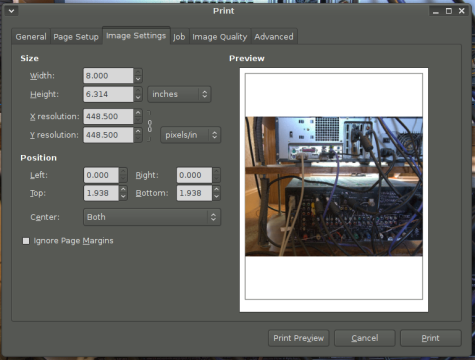
“GIMP’s default Print functionality is provided by the OS, so it does not feature much in the way of raster-image-specific tweaks.”
A bird’s eye view of the system is that CUPS serves as the print spooler and scheduler, queuing print jobs when there are more than one and relaying them to printer servers for network-shared printers. For each individual print job, CUPS pipes the data through a filter, converting the file’s original data into an output format like PostScript.
You can get improved prints from image files by using the Gutenprint driver system in place of CUPS’s defaults. Gutenprint aims at top-of-the-line quality for imaging printers such as Canon and Epson photo-quality inkjets, and will usually give better quality output than CUPS’s general-purpose settings.
At the filter stage, CUPS looks at the MIME type of the file to decide which of several conversion utilities to use, such as the text-to-PostScript filter texttops, the PDF converter pdftops, or a rasterizer such as imagetops, all of which send their output to Ghostscript. Ghostscript is then responsible for turning the PostScript output into the raw form expected by the particular printer back-end.
CUPS’s configuration allows different filters to be set up and weighted for different purposes. By default, CUPS uses the imagetoraster filter to convert raster graphics into printer-ready data. The Gutenprint project provides a different filter, named rastertogutenprint, as well as special back-end drivers for Canon and Epson photo printers.
Obviously an image embedded in a PDF should to pass through filter that takes it to Ghostscript, but for printing stand-alone images, Gutenprint is an improvement. To use it instead, you first need to install the Gutenprint packages from your Linux distribution. This may include several different packages, including cups-driver-gutenprint and foomatic-db-gutenprint. Install them all. The first helps configure CUPS itself to use the Gutenprint filter for raster files, while the second configures the Foomatic printer-configuration system (which is what you see when adding and setting up a printer) to pre-select Gutenprint when you add a new printer.
Consequently, if you have been using the standard CUPS drivers with your printer, you need to open up the OS’s printer configuration dialog, delete the printer, and then re-add the printer after you have installed Gutenprint. The Gutenprint driver will appear as the preferred driver choice for the printer, and you can simply accept the default settings. Subsequent printouts will be routed to Gutenprint, giving you improved quality without additional headache.
Conversions
There is still one more thing you can do to achieve maximum quality from your GIMP prints: do a colorspace transformation on them before you send them to the printer. In a perfect world, Gutenprint would come with built-in CM, just like GIMP, and the color management system would transform the image from your ICC working profile to your ICC device profile before it hits the printer. You would get exactly what you see when doing GIMP’s “soft proof” feature.
Unfortunately, Gutenprint does not yet support color management, so you need to apply the color transformation yourself. The LittleCMS package includes two utilities, tifficc and jpegicc, which you can run on the command line to do a color transformation. The basic syntax is tifficc -i inoutprofile.icc -o outputprofile.icc -t intent -c quality -b input.tiff output.tiff.
The intent and quality arguments are both numbers; for intent, 0 is perceptual, 1 is colorimetric, 2 is saturation, and 3 is absolute; for quality 1 is normal, 2 is high, and 3 is low. The -b argument tells the program to perform black-point compensation, which you should always choose if in doubt. You can leave off the input profile argument if the image is in sRGB, because tifficc and jpegicc assume sRGB if no profile is specified.
Naturally, the degree of improvement you will see by employing this process depends on the quality of the output device profile you create. Creating such a profile is not as simple as creating a display device profile. Argyll supports a few color measurement instruments; if you do not happen to own one of them, your best bet is to create a profile using a scanner, which of course requires that you first create a scanner profile.
On the other hand, a commercial print service may be able to provide you with printer profiles for its hardware, which it is a good idea to take advantage of for professional-quality work. You should always check the technical FAQ section of the service bureau’s Web site, however — many have very specific instructions for file preparation.
Other options: the Gutenprint GIMP plugin and PhotoPrint
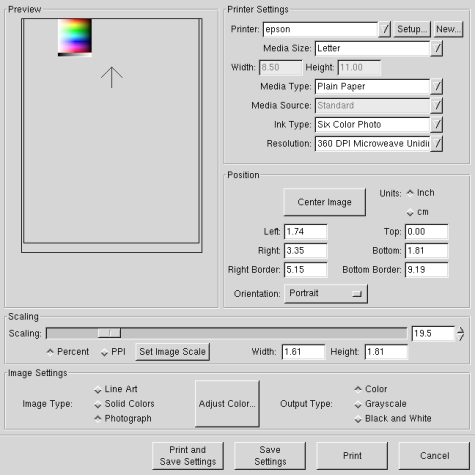
You should also consider installing the Gutenprint GIMP plugin, and open source front end to the Gutenprint drivers that gives you access to the full range of printer settings supported by Gutenprint, which are not available in GIMP’s default File -> Print dialog. It is available at the Gutenprint project site. The plugin creates a second print entry in the File menu labeled “Print with Gutenprint,” so it is okay to install the plugin without fear of losing access to the normal print functionality.
“The Gutenprint plugin provides more control for high-end inkjet printers.”
In addition to more access to printer options, the Gutenprint plugin gives you full control over placing the image on the printed page, including orientation and alignment tools, plus scaling controls.
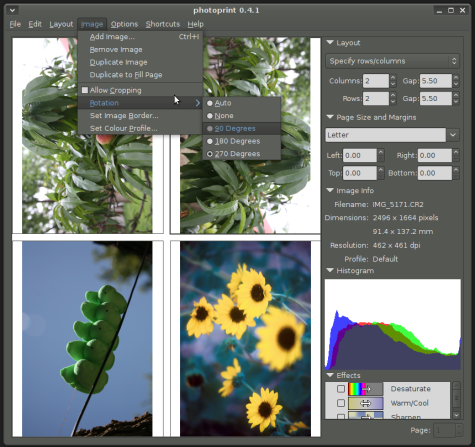
Another good printing path to consider is the stand-alone app PhotoPrint. PhotoPrint is a front-end to the Gutenprint drivers, but specifically tailored for laying out and printing photos. This includes placing multiple images onto a single sheet, border-less printing, and easy support for the photo common paper sizes. You configure PhotoPrint’s color management support in the same way that you do GIMP’s: choose “Color Management” from the Options menu, then assign display, working, and printer profiles, plus rendering intent, in the dialog box.
“Photoprint allows multi-image layout, basic image adjustments, and offers color-managed printing.”
PhotoPrint includes some fancy features like pre-defined image borders, image histograms, and basic color adjustment controls, but for most users the automatic color management is its most useful feature.
There are certainly plenty of people who are happy with the results of CUPS’ raster printouts, so do not feel any pressure to complicate your workflow against your will. CUPS’s raster filters even assume that the image’s profile is sRGB, which is the most common working profile, so you may get decent results with no reconfiguration whatsoever. Similarly, there are plenty of uses for GIMP where color management is not the main concern — but where incorrectly scaling your image or trying to print a multi-layer .XCF file causes a considerable waste of time, slowing down both the desktop and the printer. As a general rule, though, the more you understand about how image printing works, the better quality printouts you can achieve, so it is probably worth your while to sit down and profile your system.
By Nathan Willis


Pingback: links for 2010-10-18 « Where Is All This Leading To?
This was extremely helpful. Got tips on print resolution? Thanks!