There are something like a squillion and one different Avery® and Avery-compatible address labels you can buy, and with the open source LibreOffice productivity suite you can easily create your own custom fancy return address labels.
If you’re wondering what LibreOffice is, it’s an offshoot of the popular OpenOffice productivity suite. Development on OpenOffice has stagnated for the past couple of years, and most of the key OpenOffice developers have gone to LibreOffice. You can use either one for this howto. Both are free of cost, and are excellent fully-featured office suites.
Today we are going to learn how to create a page of custom return address labels, with images and custom fonts.
Creating Return Address Labels
Return address labels are easy because you’re making a sheet of identical labels. So all you have to do is design your label, and then replicate it for a full sheet of labels. When you want to make changes all you have to do is edit one master label, and then with a single click propagate the changes to the whole sheet. There are many different sizes of address labels, so first have your Avery® or Avery-compatible labels in hand so you’ll be able to select the correct template in LibreOffice. If you have a laser printer, be sure to get labels made for laser printers because they get hot, and inkjet labels may not feed correctly.
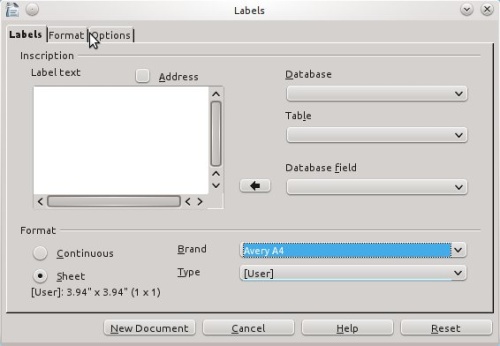
Fire up LibreOffice Writer, and click File > New > Labels. You’ll see something like Figure 1.
Figure 1: LibreOffice label template, Label tab.
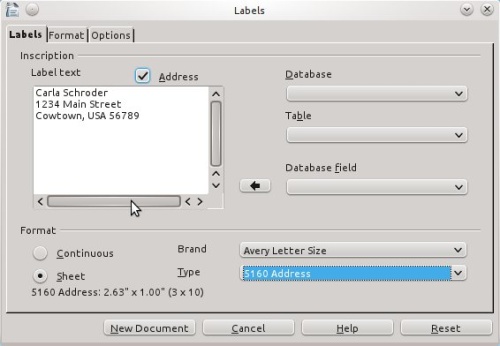
On the Label tab check Address, and Sheet. Then find your address label sheet size in the Brand dropdown menu, and label type in the Type dropdown menu. I’m using Avery Letter Size, 5160 Address. Then enter your return address in the Label Text box (figure 2). At this point don’t worry about fonts, images, or formatting, because that comes later.
Figure 2: Label text and label type.
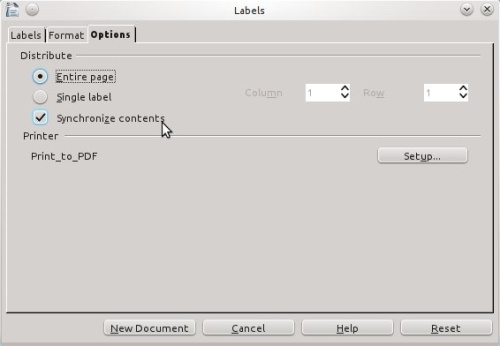
Now go to the Options tab and click Synchronize contents (figure 3). This is the magic option that enables you to change a whole sheet of labels with one click. Don’t worry about selecting a printer, because you can do that when your labels are ready to print.
Figure 3: Options tab, click Synchronize contents and Entire Page.
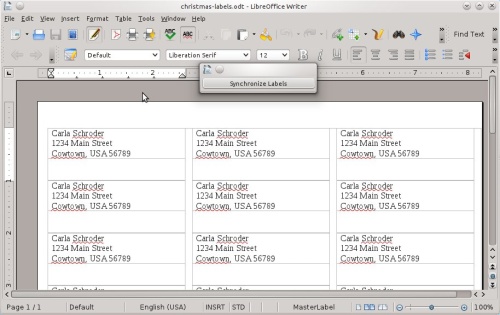
Now click the New Document button, and you will be rewarded with something like Figure 4.
Figure 4: A new sheet of labels.
If you want to start over just close this new document without saving it, go back to File > New > Labels, and edit your information.
Editing New Labels
Now the real fun begins– editing your new labels. First save your new page of labels with File > Save As, and remember to click the save button periodically. I like making my own Christmas return address labels with a cheery image. So I create or copy a suitable image from somewhere, like sites with free clipart, and use my favorite image editing program (Gimp) to reduce its size to around 2″, and no more than 100 KB. Because you can resize an image right in your label, but this only changes how it fits inside your label– the file size stays the same. So you can make a megabyte-sized image look right, but its file size will still be a megabyte, so a page of 30 labels will be crushed under the weight of 30 megabytes of image files.
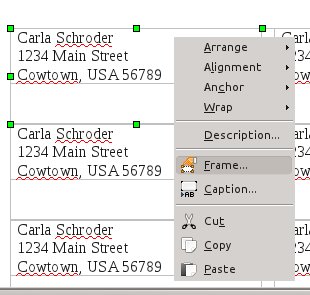
Next, let’s do a quick test to make sure the labels line up correctly. We’ll put a border around the labels to make the label edges visible, print the page, and then match it up to a page of Avery labels. Look at the bottom of Figure 4, and you’ll see “MasterLabel.” This appears when you place your cursor in the first label on the page, because this is the only editable label. Place your cursor on the border of the master label; when it turns into an arrow click your mouse to select the border. You should see green grab handles appear like in Figure 5. Then right-click, and on the right-click menu left-click Frame.
Figure 5: Selecting the master label border, and bringing up the Frame dialog to create a frame border.
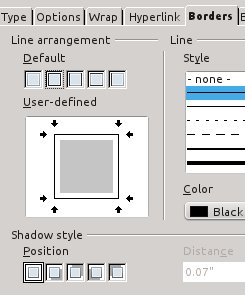
In the Frame dialog go to the Borders tab, and click on the 4-sided border (figure 6). Click OK. Then go to File > Preview to make sure all the labels now have a border. Then print the page, sandwich it on top of a page of labels, and hold them up to a light. You should be able to see clearly how well your printed sheet lines up with your labels. If you want to be finicky, you can go back to File > New > Labels > Format and adjust the borders and label dimensions. I just eyeball how they line up and guesstimate any adjustments when I’m editing the labels.
Figure 6: Put a border around each label to make them visible for an alignment preview.
You’ll probably want to go back and remove the borders because it’s unlikely they’ll line up nicely when you print them, and will look weird. Though I won’t complain if you wish to experiment and see for yourself.
Inserting an Image
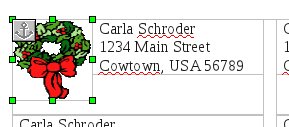
Inserting an image is so easy you’ll fall over with happiness. Position the cursor inside the master label and click Insert > Picture > From File. This opens the filepicker, so navigate to wherever your image is and click on it. Drag the image to wherever you want it, and then drag the green grab handles until it’s the right size (figure 7).
Figure 7: Insert a new image, then adjust its size and position.
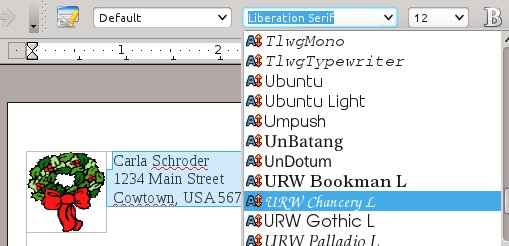
Now let’s apply a fancy font. Highlight the return address text with the cursor, and then select a new font (figure 8). You can also adjust the size, formatting and color.
Figure 8: Selecting a new font.
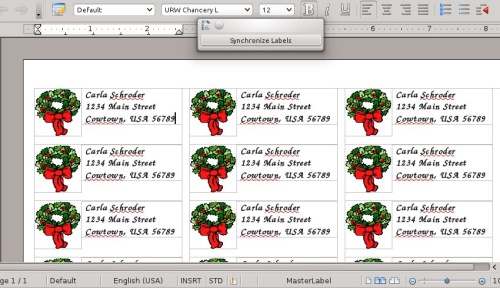
When your master label is tweaked to your satisfaction, click the Synchronize button, and voilà! Your whole page of labels is updated to match the master label (figure 9). Click File > Page Preview to see how the page looks without formatting lines, and then print a black and white copy to check the alignment with your labels. Paper is cheap and color ink is one of the most expensive fluids on earth.
You should save a master copy as .odt, Open Document Text format, because this is LibreOffice’s native format. Then you can save copies in any other format you want, including .doc and .pdf.
You can do this with any type of address label, postcard, or business card. Visit LibreOffice Help to learn more.
by Carla Schroder


Thank you, excellent reading…
Well done. Easy and useful.
Is it possible to unsynchronize the labels at a later point – so I just have the one label on my page? (I.e. as if I had selected single label from options when I created the new document)
I think I found my own answer – (didn’t realize how similar Libre and Apache versions of openoffice are!!
https://forum.openoffice.org/en/forum/viewtopic.php?f=7&t=65719
Whomever wrote this, you are my hero! NOTHING on the internet, even LibreOffice tutorials, is as comprehensive and easy to follow as this. YOU ROCK!!!!!!
~Angie
Thank you very much. Very useful.
Pingback: Preparing Labels With Libreoffice Video By Bruce Byfield | Worldlabel Blog
This is so not helpful….all of the tutorials I have read on here including this one is no good…..I have followed all directions ….and they lead me no where…..I give this tutorial a big fat “F”