
Have you searched for an inexpensive way to create artistic labels? Worldlabel.com has a nifty little tool – the Label Designer 5 – that you can download and use free for fifteen (15) days. This is just enough time to design that wine label, make stickers for a mass mailing, or to create patches for that missing bar code. The possibilities are endless, and if you decide to keep the Label Designer, the price won’t burn a hole in your budget. In this short tutorial, you’ll learn how to create a quick-and-easy label using just some of the many tools within the Label Designer 5. To follow along, you’ll need to download the Label Designer. Or, if you’re skeptical, you can follow along and decide to download later.
The Label Designer 5
You can go to the Label Designer page to download the software for Windows Win98, Win2000. WinME, WinXP and Windows Vista. The size is a mere 4kb, so it takes little space. Once you download the software, click on the icon on your desktop (or the name of the software in your download file) and follow the instructions to install the software on your computer. Allow the software installation to install an icon on your desktop so it’s easy to access. Click on the software icon on your desktop, and you’ll see the following image:

Click on “Use Trial,” and another window will pop up:
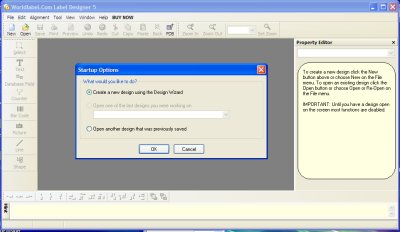
Click on the “Create a new design using the Design Wizard,” and you’ll see a new window that shows you a number of label sizes and shapes that you can purchase through Worldlabel.com:
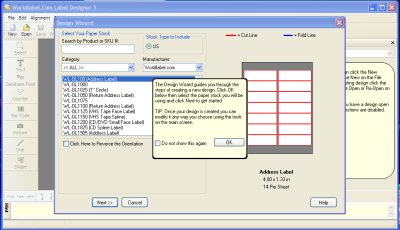
For this exercise, you can click on the menu button under “category” and choose “Name/ID Badge.” One label will be presented, the WL-OL5030 (Name Badge Label). Before you click on the “Next” button, look around this tool a bit. You’ll see that you can reverse orientation on any label you choose, you can retain this size label for later use, and you can search by product or by SKU number. Convenient! When you click on the “Next” button at the bottom of this window, another window will pop up that shows the label along with an area for you to upload a template if you had one. Since you’re creating this label from scratch, click on the background button at the top of this window. Click on “Select or Customize Background and you’ll see something similar to this image:
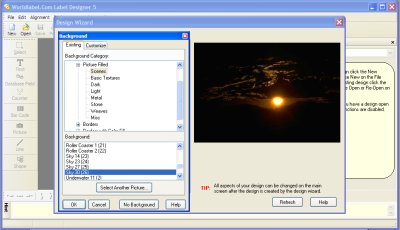
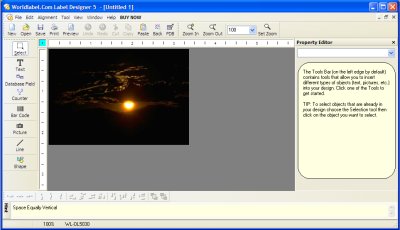
I say, “something similar,” as I’ve already chosen a background for this name tag. I went to “Picture Filled > Scenes” and then flipped through some images in the bottom left window to settle on the sunset image. You can pick a different image if you like, and once you settle on a scene (or another background, such as a texture, a gradient, or a color-filled background with a border, then click “OK” and then “Next.” You’ll learn that you’ve finished with the design, and you can click “Finish.” Your image will show up on the screen within the Label Designer like so:
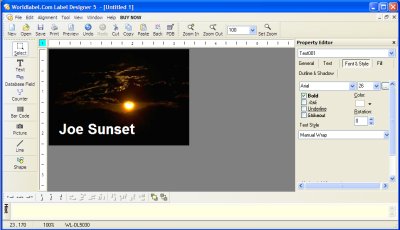
Since this is a “quick-and-easy” guide, I’ll point you immediately to the buttons on the left of the Label Designer tool:
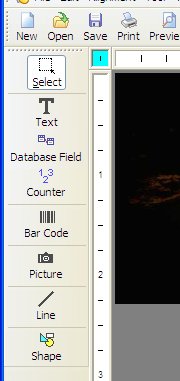
You can use the top tool to select anything within the art window by clicking on the item in the window where your picture is located. The second tool is the text tool, and you’ll use that tool in a minute. The tool located below the text tool allows you to insert a bar code, and the following tool is the picture tool, which allows you to add more images. Finally, the last two tools are art tools that allow you to draw a straight line and to add graphic images such as arrows. All these tools are used in almost the same way, so using the text tool will give you a leg up on how to use the other tools. Since this is a name tag, you’ll want to add a name to the art image in the window. To do this, click on the “T” for the text tool and then click on the artwork. When you click on the artwork, a “Property Editor” will pop up on the right side of the Label Designer window:
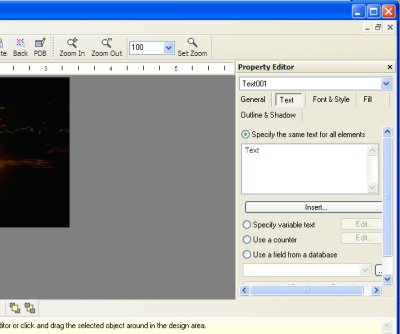
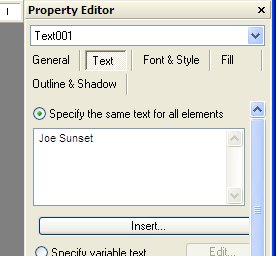
In the window that says, “Text,” you can place your cursor and write whatever you want. In this case, I wrote “Joe Sunset”:
You will not be able to see the type on the image, as the default color of the text is black. So, you’ll want to change the color, and probably change the size of the text as well. Click on “Font and Style,” and the following tools will appear:
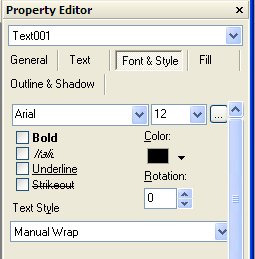
I clicked on “bold,” changed the point size to 26 (the numbers next to the font name, “Arial”), and changed the color to white by clicking on the color patch in the area shown above. The label now looks like this (like magic!):
Now you can click on the name and drag it around the name tag to place it anywhere you want. You may discover that your text does not fully show on the artwork once you change the type font and color. The text is there – it’s just hidden behind the layer that was created when the text was smaller. Simply click on the text at the edges until you see an arrow. At that point, drag the edges out and/or down so that the entire text is showing. If you feel your name tag is finished, then go to “file > save” to save it on your hard drive.
The free version of Label Designer 5 will place a watermark on your product, but this watermark is eliminated once you purchase the product. You can now print out the name tag, copy and paste it so that you have a number of name tags to print out on a full page of labels, or save it for later. Once you get the feel for the Label Designer, you may discover that this tool can cut your time and save you money when you’re under the gun to produce various creative label products. You can crop, mirror, flip and rotate images, and add noise and gamma and other effects just like any other top-line graphic program. You also can use your own artwork and/or photographs or scan pictures or use a digital camera to add artwork directly into this program.
Think about all the designs you could create for CD, VHS, cassette, diskette and Video spine and face labels. Glance through all the formats to recognize your potential! The true value to this tool, which currently can be purchased for a mere $24.95, is that your formats are already created for you – all you do is add artwork (or not) and text or bar codes, dates and more. Whatever you need for your creative labeling is right here in a smart little package.