List styles are an open secret in LibreOffice and OpenOffice.org. If you press the F11 key to open the Styles and Formatting palette, they’re in plain site at the end of the buttons for the five types of style – yet hardly anyone goes beyond their basic use or even uses them at all. However, if you take a closer look, there are all sorts of ingenious uses for list styles.
Like any type of style, lists styles save time. Change the style, and in seconds you change the formatting of every instance that you use the style throughout the document, instead of hunting down each instance and changing it manually.
Lists come with a variety of pre-set formats that you can choose instead of doing your own fine-tuning. However I would advise you against using those on the Graphics tab for the style, unless you actually want a retro-Nineties look. Mostly, you will be working on the Position and Options tab for each list style.

Position-tab
Options-tab
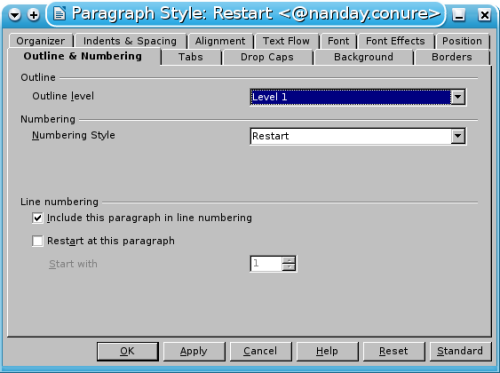
However, working with list styles is more complicated than working with other types of styles. For one thing, once you have configured a list style, to use it you need to associate it with at least one paragraph style from the paragraph style’s Outline and Numbering tab. The easiest way to make this association is to use the paragraph style with the same name as the list style – for instance, for a bullet style, List1, and for a numbered style Numbering1. You may also want at least one character style, most likely the already-created Numbering Symbols. Alternatively, you may want to create parallel list, paragraph, and character styles that are more descriptive, such as Red Numbers or Diamond Bullets.
Once you have these basics down, you are ready for more advanced features.
Restarting Numbering Automatically
One of the advantages of list styles is that you can use the same list style with multiple paragraph styles. This feature is especially useful when you want to use the same list style, but restart the numbering.
To restart the numbering, clone the list style and give it a name like Restart Numbering1. Do the same thing to clone a paragraph style and associate it with the list style of the same name. You will have to adjust the fields on the Positioning tab, because whenever a new style is cloned from a list style, the new style is automatically indented. However, once you have set up the restart styles, restarting numbering is just a matter of changing paragraph styles. It’s a task that using styles can simplify immensely.
Nesting Lists
At times, you may want a top level list with its own numbering, and a list item that has its own sub-list of items, numbered differently for convenience. You have two ways of formatting in this situation.
First, go to the Outline tab in the list style dialog window and select the numbering formats you want. Should you not find the numbering you want, you can set the format for each numbering level from the Positions tab. When you want to create the nested list, press the Enter key followed by the Tab key, and the bullet or numbering will change.
Second, create a list style specially for the nested list. Choose whatever numbers or bullets you want, and set the start of the text further from the left margin than the text in the top level list using the Indent At field on the Positions tab.
Adding a second paragraph to a list item
Usually, items in a bulleted or numbered list are no more than a paragraph long. However, occasionally – especially in technical material – you may want to add another paragraph to the same list item.
You could just press the Enter key to create a new line, then press the Backspace key to delete the bullet or number. However, this manual solution can cause problems with your lists if you are moving items around.
A better solution is clone the paragraph style and create a style in which the text is aligned with the text in the list style. If you are working with the Styles and Formatting palette open, you can format the second paragraph in a list item without much slowing down.
Increase the Space to a List Item
Sometimes, a document’s design requires more white space between a bullet or number and the list item. Often, too, when a numbered list reaches two digits, the extra character throws off the spacing.
In such cases, go to the Position tab. Set the Numbering Followed by to Tab stop, then specify the exact tab. Give the Indent at field the same value as the tab.
Edit Outline Levels at the Same Time
Most of the time, you probably want each outline level to use the same settings so that the document has a uniform look. Instead of laboriously adjusting the settings one level at the time, select 1-10 at the bottom of the Level pane on both the Position and Options tab.
Choose a New Character for Bullets
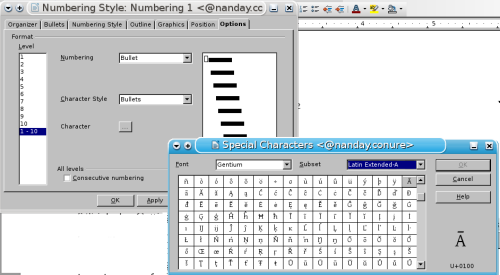
Most fonts have at least one character for bullets, which the list style will use automatically. However, nothing stops you from choosing another font for the bullet, either because it is bigger or because it has characters like those for card suites, or a dagger. Better yet, you can use dingbat sets to create unique bullets. All you have to do is set Options → Numbering to Bullets. When you do, the Character button appears below. Click the button, and you can select any font and any character you want for the bullet.

character-bullets
Use a graphic bullet
If you want to use a graphic for a bullet, set the Numbering file on the Options tab to Graphics. You don’t have to resize the graphic ahead of time – you can use the fields that appear within the tab to set the width, height and alignment. You can also select Linked Graphics to reduce the memory needed to store the graphic within the document, but this choice can lead to confusion unless you are careful to keep the document and the original graphic in the same paths relative to each other.
Besides creating a list, a graphic bullet can be used to automate the addition a reoccurring symbol, such as a logo, or, in a manual, a warning or caution symbol. You can add text to the paragraph, but, if you don’t, add a space before starting the next paragraph. The space is necessary because, without it, LibreOffice /OpenOffice.org will delete the bullet.

Use a List Style Instead of Autotext
On the Options tab, you can place up to thirty-two characters before or after the number or the bullet. Usually, this feature is used to place a bullet or parentheses after a number. More elaborately, you can add something like “Step #†before the number.
However, you don’t need to use the Before and After fields with a number at all. If the Numbering field is set to None, then applying a paragraph style will simply add the text in these fields. This set up can be used with the paragraph styles with names like Numbering1 Cont. if you want to add automatically that a list is continued.
Another possible use is to create a warning or caution in a manual. Start with a graphic bullet customized to use an appropriate international symbol, add the list style that is blank except for the Before or After fields, and, finally, add the text of the warning or caution in a third paragraph style.
Customize the Character Style
Because list styles are associated with a character style, you can format a bullet or number separately from their list item. For example, you can change their font, font style, or font color, their size, or their background color. If you want, you can even rotate the bullet or number along with any before or after text, to whatever angle you choose.
Final Words
Once you start using the advanced features of list styles, the opportunities for creating a mess increase – especially when you start to adjust the spacing. When you have a mess (and it’s often a question of when, not if), remember that the Position tab has a Default button and that you can press the Cancel button at the bottom of the dialog window at any time. Once you close the dialog for the style, you can also use Undo to back out of most of the changes you make.
But, whatever happens, making full use of list styles takes time. Unless you are fond of tweaking format, once you are finished, save the document as a template so you don’t have to recreate things a second time. Just because there are some ingenious twists to list styles doesn’t mean that you should linger over them more than absolutely necessary.
BY BRUCE BYFIELD


How do you exactly do all you say in “Customize the Character Style”?
To change the font style of numbered lists:
– Select the text (including list items) you wish to adjust.
– Right-click, then select “Edit Paragraph Style…” from the context menu.
– Select the “Font” tab and choose your desired font.
– Click the “Apply” button.
NOTE: Sometimes the settings will not “take” unless you also click on your desired selection under “Typeface” and “Size”, even if you don’t wish to change these settings.
Hi,
In Libre office if we do the subtotal of more than 7000 rows than its throwing me out ….how is that possible to do…? pls suggest
After all this, I still don’t understand how to select a small graphic box for a bullet in OpenOffice on Windows. Surely not such a crazy demand?
@cis, if what you want is a “checkbox” type of list, the way I do it in LibreOffice is create a bulleted list, then Format menu -> Bullets and Numbering, click on Options tab, click on the square button to the right of “Character” to bring up the Special Characters window, choose the Unicode character 25A1 (“White Square”, it’s in the Unicode “Geometric Shapes” subset of TimesNewRoman and other fonts).
I don’t understand how you do to put the graphic bullet ABOVE the text in the warning sign example. I’ve tried all the options but still can’t find a way 🙁
Your instructions would have benefited from actual screenshots of the results you were describing, as the saying goes… A picture is worth a thousand words.