
We learned how to create fancy return address labels with LibreOffice in our last installment. Today we’re going to tackle mail merge. Mail merge is a powerful, time-saving word processor feature for addressing mass-mailings and form letters. It’s easy but a little weird in LibreOffice, so follow along and learn how to be a mail merge guru.
Address Labels and Form Letters.
If you’re not familiar with LibreOffice, it is a superior offshoot of the popular free office suite OpenOffice. LibreOffice is cross-platform and runs on Linux, Mac, and Windows, and provides a word processor, database, spreadsheet, drawing program, and slideshow creator. With LibreOffice you can create address labels and form letters. It all starts with your database of addresses, and then following the not-very-intuitive steps to merge your addresses into your document. This is not well-documented in the LibreOffice help documents, and if you try to figure it out yourself you’ll get lost. So follow along and learn the right way– it’s an easy few steps when you know how. If you don’t have an address database, you don’t have to be a guru to create one because we’ll show how to do that too.
Using an Existing Address Database
Your #1 most important task is having a good clean database of addresses. Computers are not magic; garbage in, garbage out, and if your database has errors so will your mail merge. If you don’t have an existing address database then you’ll have to create one, which we will do in the next section. For this article I will assume you either have a local copy of the address book you want to use, or know how to connect to a database server.
LibreOffice can import data from any number of databases, so if you already have address databases you’re ready to rock. Follow these steps to create a sheet of address labels from an existing address database, which for this article I will creatively call “addresses”.
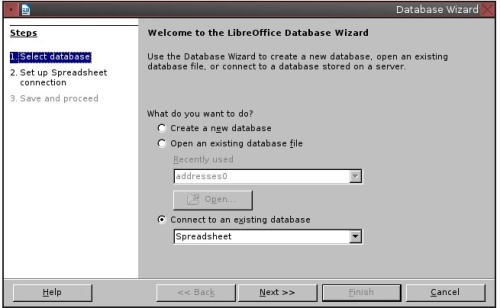
First open LibreOffice Writer, and then register the database you want to use, which is creating a connection to it. Open File > New > Database. Check Connect to an Existing Database, and click on the type of database you want to use. In figure 1 I’m selecting “spreadsheet” so I can use an address list I keep in a spreadsheet.
Figure 1: Registering a new database with LibreOffice. First select an existing database.
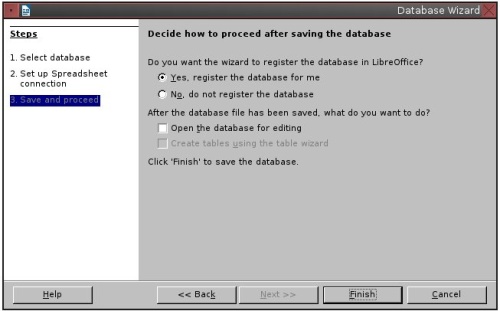
You must select whatever type of database you want to use. Then click Next and click the Browse button. This opens a filepicker; find the database file you want to use, and then click Next. It asks “Do you want the wizard to register the database in LibreOffice?” Click Yes. Make sure that Open the Database for Editing is not checked, because it will try to open it in LibreOffice Base, and that will make a mess (figure 2).
Figure 2: Completing the database registration.
Click Finish and give your new connection a name. This only names the connection, and it won’t change your original file.
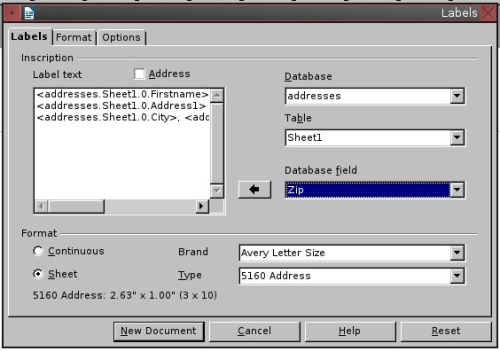
Next, click File > New > Labels. Select the type of label you’re going to use, which in this example is Avery Letter Size, 5160, Sheet. Make sure that the Address box is not checked. Then go to the Database field and select your database, which should be in the list after you registered it. Select the correct table in the Table field. If you’re using a spreadsheet, the Table is the sheet of your workbook that has your addresses.
Use the Database field to select the fields you want to appear on your address labels. This is a little weird to use– be sure to do these in order, because the only way to re-order them is to delete and start over. For example, select Firstname and click the arrow. Enter a space and then put Lastname in the address box the same way. Press the return key to start a new line and keep going. I like commas on the city, state, zip line. When all your fields are selected it should look like figure 3.
Figure 3: Selecting your registered database for creating address labels, and selecting the address fields.
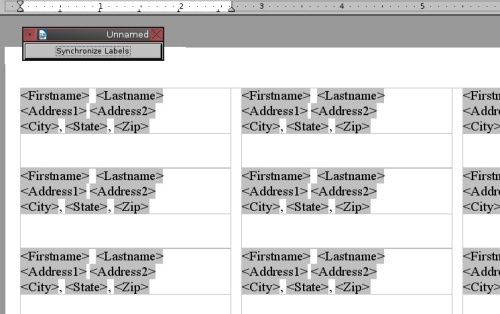
Next, go to the Options tab and click Entire Page and Synchronize Contents, then click New Document, and you will be rewarded with something like figure 4.
Figure 4: Your new page of labels with all of your fields.
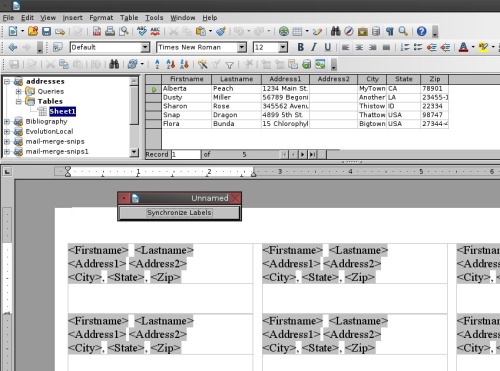
Where are your addresses? Don’t worry, we’re almost there. Click F4, or View > Data Sources, and a pane will open displaying your database (figure 5).
Figure 5: View > Data Sources exposes your database, and you can make changes to your labels from this.
Notice also the Synchronize Contents button. This is a second chance to make any corrections. The first label on the page is the Master Label, and any changes you make to this will be propagated to all the labels. You could insert a picture, change the fields, fix spacing, anything you want. Then click the Synchronize button and all the labels will change to match the Master Label. (Read Creating Custom Fancy Address Labels in LibreOffice to learn more about this.)
The last step is inserting your actual data, and you do this by clicking Tools > Mail Merge Wizard. This is eight screens, and you should be able to breeze through them:
- On the first screen click only Use the Current Document.
- On the second screen check Letter as your document type.
- On the third and fourth screens un-check everything.
- It should skip the fifth screen, the layout screen.
- On the sixth screen you get a preview of the first label, and can preview all your other labels as well. You have one last chance to make corrections by clicking the Edit Document button. Click the Next button to create your labels
- Which takes you to screen seven, and yet another chance to edit your labels.
- The eighth and final screen has some save options, which I don’t believe are useful because all of your documents are still open, and you can save and print them like normal documents. Click Finish to complete the wizard, and there you are with your labels all ready to print, like in figure 6.
Figure 6: My test page of five labels.
Your newly-generated pages of labels are not editable, so if you need to change anything you have to go back and start over.
Creating a Simple Address Database
A database like LibreOffice Base is overkill for a simple address book, so I keep mine in a spreadsheet because it is fast and easy, and if I ever want it in a real database then I can import from the spreadsheet. You need only two elements in your address book database: a header row and your data rows. You always need a header row to supply the field names, like in figure 7.
Figure 7: A simple spreadsheet address book.
That’s all for now, so be sure to come back and visit the WorldLabel blog for more good howtos!
BY CARLA SCHRODER



Libre office is a great program. It also has a GNU public licence which allows me to use it for free in my office where I have my own business.
Thank You,
It was just what I needed!
Great stuff, but the most intriguing bit is at the end. If I’ve got my labels in a spreadsheet, do I have to import them into Base first. or can I create the labels from the spreadsheet?
Thanks
Thanks very much for writing this helpful FAQ. It cured a big headache for me! I’m wondering, though, if there’s a way to merge the data into an existing sheet of labels instead of doing File > New > Labels. The reason is that I need to customize the formatting every single time I merge. It would be a big timesaver to customize the sheet once and then just import new data every time.
SOLVED: After looking around a bit, I found the answer: Save the original labels once they’re formatted (before they’re merged).
Then go to Tools > Mail Merge Wizard… and then at Step 3 (Insert Address Block) click “Select Different Address List…”
This worked beautifully for the first set of labels I made. However, when I tried it for the 2nd set, the labels printed about 1/4 of an inch to the left of the actual labels. When I did a print preview they looked fine but had an issue only when printed. Not sure how to fix the problem.
Hi, this sounds like printer settings. Is your printer a laser or inkjet?
Thank you
Russ
it’s a laser printer
Call me at the office and i will try and help with your printer settings. 877-9552235
Thank you
Russel
This was SO helpful. I’d been researching a long while. Two problems, however. When I print the merged labels I get a blank sheet every-other one. Also, I have a blank line in my address label for “address2” when I sometimes need it and sometimes do not. Is there anyway to have an automatic line space elimination when it is blank? Thanks again so much!
Thank you very much for this excellent tutorial! I was stuck on a system without Office and was struggling with LibreOffice’s mail merge feature. Still strongly prefer how Word does it, but you are an absolute lifesaver.
In response to Norda’s comment, I was having a similar issue, along with some alignment problems. Instead of printing from LibreOffice, I printed the odd pages only to the PDF24 driver, then printed from Adobe Reader using the “print actual size” selection and everything then came out perfectly.
Thanks, Carla! This hands on guide was really helpful. I did this the first time with LibreOffice and was missing the Base application among other things. Also had to work with the print margins a lot since I was printing directly on label paper.
A rather long list of steps, and the logic in how to do this is somewhat awkward, but I think this will go really fast next time I have to print labels.
Thank you so very much! This was a lifesaver for AGAL in Galicia.
I have been struggling with this for years; yours is the first resource that I have been able to understand enough to implement. I can’t thank you enough.
I have followed your instructions but after the “mail-megre” step my data does not replace the “symbolic parameters”.
I’m using Ver. 4.0.4.2 of LibreOffice.
What am I doing wrong?
I come to this thread every time I do the label printing for the London Bat Group newsletter, so just wanted to thank you for your help! I used to tie myself in knots but now the job is really simple. Cheers 🙂
This is a very good guide – but what if I have a document template that’s not on the list? I have an extant labels template and I want to insert mail merge fields, but it seems I can’t update the rest of the label fields with successive entries – inserting the MM fields only creates duplicates of the first field. Any suggestions?
Good article, but didn’t work for me. I created the database as a spreadsheet, registered it, then designed the label using Avery A4 sheet label style L7563 and created a new document. When I got to the Mail merge wizard, the second of the eight screens gave me a choice of only letter or email, no offer of my A4 sheet. Consequently evrything that followed remained greyed out and I could not proceed
Hi,
I’m having the same problem William has – it prints a sheet of labels for each name in the list. Using the latest version, (4.0.6.2) it does NOT substitute more than one name on each page.
How do you make it do that? I believe I followed the steps in your guide faithfully…
Your help was invaluable. I’m used to solving things by clicking around, but there was no way to click around and figure this out! Or to figure it out from the libreoffice online help. Thank you SO MUCH–now that I have my labels, I just might be able to send my Christmas cards!
Excellent, thank you! The only thing I had to change is that, without editing, the addresses print right at the top left edge of the label. A blank line at the top and a tab at the left were needed to create margins.
I have a spreadsheet containing the names & addresses. I needed to add some new people. So I amended the spreadsheet. On screen 3 (of Tools-> MailMerge Wizard, I made the mistake of selecting the spreadsheet (after clicking the ‘Select Address List’ button followed by the ‘Add’ button). I now have the spreadsheet entered twice on the ‘Select Address List’ window. However, there seems to be no means to remove this second list – the Edit button is greyed out and there is no ‘Remove’ or ‘Delete’ button. Any ideas?
hi thanks for posting such a detailed walk through,
it worked “OK” for me, all just as you said.
however the dingbat decorations of green and red stars that I put on the first label didn’t seem to replicate, so I had to copy-paste those by hand. the final document. the final document (page of labels) is actually editable. just as well since the document did not line up very well with my Avery j8159 labels on A4 and I ended up making a manual adjustment on the margin to compensate.
So it was a lot of palaver for a not brilliant result, but it still beat writing 20 something Christmas card addresses by hand. So …thanks and Merry Xmas.
Hi Worked just fine However How Do you Change Font Size ?
thank You
Hi,
couple of quick follow-ups.
1) My dingbat decorations – actually this was just because I hadn’t ticked the ‘Synchronise Labels’ – so … RTFM ! your instructions are fine, just didn’t follow them properly.
2) I think it is possible to do more than you are showing above. For instance once you press F4, show data sources – it is possible to add fields from the database into the master label, and to filter the database (e.g. only merge records where name IS NOT EQUAL to NULL) kind of thing.
so 2 + points, on the other hand :
For a second batch of labels – I successfully made it up one evening, albeit with a certain amount of faffing to get the margins right then on return 2 days later realised I needed a new field in the label. After 1.5 hours of struggling, I gave up and used the version of MS Word on my wife’s computer to do it in ~ 10 minutes. My issue may have been exacerbated by the fact that my “database” (spreadsheet) was stored on a windows share server, and Libre Office couldn’t seem to associate with this once a new session started. Hence, every time I went to merge, it did not seem to be aware of the database associated with the labels (even though I associated it with it both on the New/Labels and again in ‘Data Source’ dialogues. Very frustrating !
In the end, I think MS Word just does this stuff much better – for instance no need to faff about with the margins, it correctly positions the text every time. Also no need to go through the double-step of ‘make database connection’ then ‘make labels based on database connection’
When I get to Figure 4, it does not show up. (Had it once; can’t get it again) I’ve tried clicking on New Document in both the labels and option sections. The ‘processing circle’ just goes on and on and on… I’m already wasted four hours trying to do this…am very discouraged and frustrated…
Wonderful Article I Follow so many articles but this is the best one
!!
Thanks for this tutorial. I now need to suppress empty fields. Can you help here, please?
Julie
Great tutorial. Had problems printing individual pages, but I printed the whole thing to a PDF file and Acrobat was able to print the way I needed it to. Thanks for the great job!