If you want to keep tabs on your deadlines, you don’t need a fancy project management application — often, a simple spreadsheet can do the job. To see how, let’s create a spreadsheet that tracks task deadlines, shows the current status of each task, and highlights scheduling conflicts. In the process we’ll learn a few useful Calc techniques.

To keep things simple, we’ll create a separate sheet for each month, with three columns: Task, Deadline, Days left, Status, and Conflict. The Status column might hold values such as “In Progress” or “Completed.” Depending on the current status, the cells in the Days left column will display either the number of days to the deadline or “OK.” If the deadline for the task has passed but the article’s status is not “Completed,” the Days left column will display “OVERDUE,” making it easier to quickly locate unfinished and overdue tasks. Finally, we’ll use the Conflict column to identify scheduling conflicts: if two tasks have the same deadline date, the Conflict cell of the offending task will display a “CONFLICT” warning (ideally, the spreadsheet should mark both conflicting tasks, but I’m still working on how this can be done).
The key elements of what we’ve described are two formulas in the cells of the Days left and Status columns. Let’s take a look at the Days left formula first:
IF(DAY(B2)-DAY(TODAY())<0 AND (D2<>”Completed”);”OVERDUE”;IF(D2=”Completed”;”OK”;DAY(B2)-DAY(TODAY())))
To better understand how that works, let’s break it into several logical parts. The formula itself is based on the IF function, which uses the following format:
IF(Test; The_value; Otherwise_value)
In our case, the test part checks whether the number of days is less than 0 (i.e., whether the deadline has passed) and the status is not “Completed.” If both conditions are met, then the value of the D2 cell (the Days left column) is set to “OVERDUE.” Otherwise, the formula runs another IF function that sets the value of cell D2 to “OK” if the article’s status is “Completed”; otherwise it sets the value to the number of days left to the deadline.
Now on to the formula used in the Conflicts column:
IF(COUNTIF(B2:B31;B2)=1;”OK”;”CONFLICT”)
This formula uses the COUNTIF function to count the cells containing the same date as the B2 cell. If the count is 1 (meaning that only one article is scheduled for the specified date), then the formula set the value of the E2 cell to the “OK”; otherwise it sets the value of the cell to “CONFLICT.”
Once you’ve specified both formulas for a single row, you can apply them to other cells in the Days left and Conflicts columns by selecting the cell with the formula and dragging the selection handle over other cells in the row.

Calc scheduling spreadsheet in all its beauty.
Although the spreadsheet is ready to go, there are a couple of things you can do to make it more efficient and easy to use. For starters, you can turn the cells in the Status column into a drop-down list containing predefined values. To do this, select the Status column and choose Data -> Validity, and select List from the Allow drop-down list. Specify status items in the Entries field and press OK.

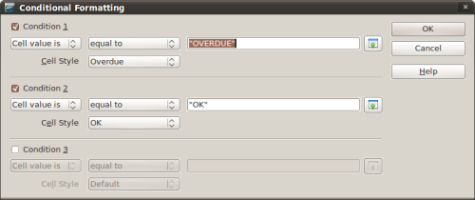
Specifying conditional formatting options.
You might also want to spice up the spreadsheet by applying conditional formatting to the cells in the Days left and Status columns. For example, you can specify conditional formatting that displays the “OVERDUE” warning in red bold font on a yellow background. To do this, use the Stylist (press F11 to evoke it) to create a new style using with the described formatting and save it as “Overdue.” Select then the first cell in the Days left column and choose Format -> Conditional Formatting, and specify the following condition:
Cell value – is equal to – “OVERDUE”
Cell Style – Overdue
In a similar manner, you can specify conditional formatting for the cells in the Conflicts column. To make data entry easier, you can use two extensions: DataForm (http://extensions.services.openoffice.org/project/DataForm) </a> and Date Browser (http://extensions.services.openoffice.org/project/RiessDateBrowser). The former adds a data entry form that makes it easier to enter data in cells, while you can use the latter to quickly enter a date in a cell in the Deadline column using the Date picker pop-up window.
That’s all there is to it. Obviously, this solution doesn’t rival a dedicated project management application, but it can help you to keep track of your tasks and deadlines with a minimum of fuss.
BY DMITRI POPOV
![]()

Take a look at our free PDF planner Pro
