Despite the fact that open source has specialty label-and-business-card programs like gLabels and capable desktop publishing apps like Scribus, most general office users are going to continue to create their documents in the word processor of the office suite they feel the most comfortable in, like OpenOffice.org Writer. It is certainly a good choice, too; it provides design wizards that simplify creating print-ready documents for standard label templates, and OpenOffice’s mail merge backend is quite powerful.
by Nathan Willis
Basic design
To create a basic label or business card document, simply choose File -> New -> Labels or File -> New -> Business Cards. A configuration window will pop up, with several tabs for specifying things like page dimensions, label dimensions, text formats, and so on.
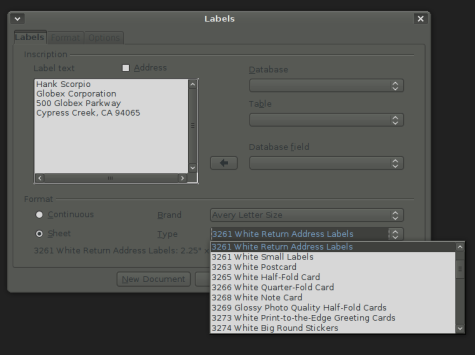
The Labels dialog has just three tabs: “Labels,” “Format,” and “Options.” In the bottom of the Labels tab is the template selector, so you can simply choose from among the dozens of pre-configured label sheets that Writer supports — including all of the standard Avery options, plus several other brands. If you so desire, you can choose [User] as your label type; this will require you to specify the size and placement of the labels manually in the Format tab.
“The New Label creation dialog, where you can enter standard text to be reproduced on every label, and choose from dozens of pre-configured label types.”
If you need to print a page of identical labels (such as return addresses), you can simply enter the text in the “Label text” field of the Labels tab. Last but not least, the Options tab allows you to create an entire page, or just a single label, placed anywhere on the template you desire. When you have your settings chosen, click New Document.
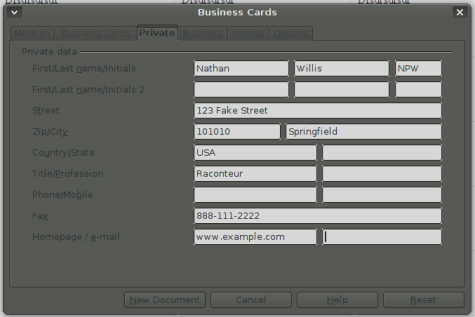
The Business Cards dialog is significantly more complicated. The “Medium” tab allows you to select existing templates, whereas the content of the cards is created on three separate tabs, named “Business Cards,” “Private,” and “Business.” The Business Cards tab holds several information templates, such as “Modern, with Name” or “Elegant, with Name, without Slogan.” These pre-sets create the sheet of business cards by pulling the specified information off of whatever you enter in the “Private” and “Business” tabs.
“The Business Cards dialog, which splits up personal and business data. The actual card layout is defined by templates chosen in the ‘Medium’ tab.”
You do need to be sure that you select a business card template in the Medium tab, however — the Business Cards tab appears to have a drop-down selection box for creating business cards, but this only creates the pre-filled lines of information, it does not correctly lay out a sheet of cards. The Format and Options tabs offer the same choices as they do when creating label sheets.
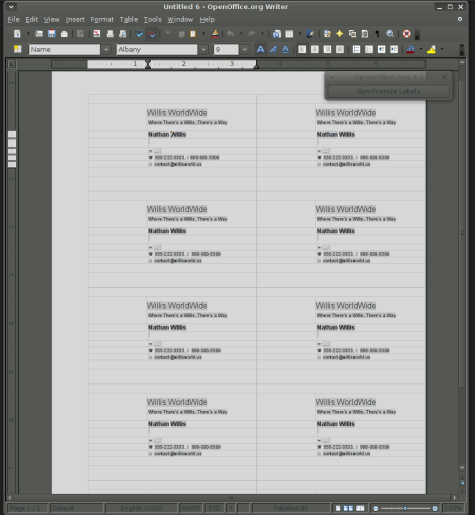
“Writer’s business card layout — the basic design is pretty bare-bones, so you will probably want to customize it. Note, also, the floating ‘Synchronize Labels’ window, which you can use for adjusting for blank lines.”
In either case, the new document that Writer creates is fully editable; using the wizards this way allows you to create a non-mail-merge document. You may still want to perform heavy customization of the page once it is generated. For this, you have all of the power of OpenOffice’s design tools, including embedding images and control over text, line, and background colors.
If you plan to make modifications to the text itself, however, you need to do so not by highlighting text and changing its font characteristics directly, but by using Writer’s Paragraph Styles. Right-click on any word on the page and choose “Edit Paragraph Style…” In the dialog box that pops up, you can fix any attribute of the text, from its font, to its spacing and indentation, to drop-caps, text flow and special effects. You will need to edit each card or label element’s paragraph style in this way; the styles tend to apply only to the particular field (e.g., Name). But by editing the paragraph style, you instantly change all of the cards and labels, without running the risk or overlooking one accidentally.
Finally, you may print your work directly or save it to a file. But if you plan to reuse the design, consider saving it as a template file instead of a regular document; this is especially important with labels, but could save you considerable work matching subsequent print jobs of any type.
Mail merge
The section above dealt only with all-of-one-kind document designs. By using OpenOffice’s built-in mail merge functionality, though, you can create and print merged label sheets with very little extra work. OpenOffice’s mail merge feature starts with the idea of “data sources,” which are general-purpose links to external data such as a MySQL database, a CSV file, or an address book application.
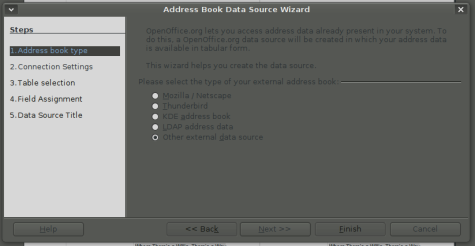
“OpenOffice.org’s data source functions allow you to tie in databases, address books, or spreadsheets — not just for mail merges, but for any purpose.”
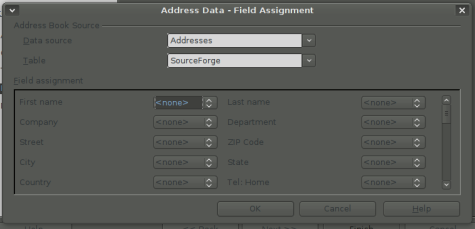
The first step in printing a page of mail-merged labels, then, is to set up your address list as a data source. Open File -> Wizards -> Address Data Source; the dialog presents several options for the type of data source you are configuring (e.g., LDAP, Outlook address book, etc.). For a spreadsheet or a CSV file, choose “Other external data source” and click Next. You’ll be asked to specify the file to use and to further refine your source type (in CSV files, for instance, to mark which fields correspond to name, address, ZIP code, and so on). Finally, you assign a name to the data source; this name can be anything, and will be the name the source is listed as when you are performing the merge.
The label generation process starts the same for mail merges: choose File -> New -> Labels. However, in the Labels tab, you choose the data source you just configured, from the “Database” drop-down selector. Depending on the data source, you may also need to select a “Table” in the selector below. The available fields will be displayed in the “Database field” selector; simply choose each field in turn and click on the arrow button to add it to the Label text box in the proper order, adding line breaks or punctuation where needed. Also, be sure to select the “Synchronize contents” box in the Options tab.
“When defining an address data source for a merge, the most important step is assigning the fields correctly.”
When you click New Document, Writer will pull the data from the data source and create your sheet of labels. In the Print dialog, you can choose whether to print the entire sheet, or portions of it, on a label-by-label basis.
So far, there is no built-in functionality to assist in printing a mail-merged set of business cards, such as a full office might require, but you can do essentially the same thing by following the instructions for a label mail merge, set to a business card label template in the Labels tab, and importing your employees’ names and contact information.
Troubleshooting
The most common problem when creating mail-merged documents is stray blank lines, which are annoying in form letters, but can ruin a sheet of labels by messing with the alignment. Writer provides a technique for fixing blank line troubles, though it takes a few steps.
The key is to use paragraph delimiters between lines, not simple line breaks. The Label wizard treats line breaks as literal characters, but separate paragraphs as something that can be automatically removed. It is a distinction that isn’t made clear during normal editing, so in order to fix it, choose View -> Nonprinting Characters from Writer’s main menu. You’ll then be able to see which lines in your design end with a paragraph character: ¶.
Next, select View -> Field Names to toggle visibility of the fields in your document. They look something like <MyDatabase.Sheet1.0.Firstname> or <MyDatabase.Sheet1.0.Country>. For each field line that ends with a newline character and not a paragraph, click the cursor at the end of the line, then hit Delete, followed by Return. You should see the paragraph character appear, denoting the change. You only need to make these changes to the first label on the sheet; we can propagate it to the rest later.
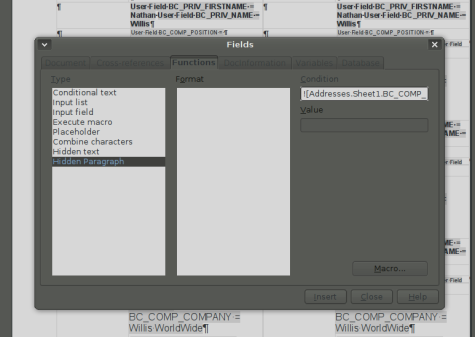
When all the paragraph characters are in place, click at the end of each line, then choose Insert -> Fields -> Other. In the pop-up dialog, go to the Functions tab and choose Hidden Paragraph. In the Condition box, enter the name of the database field, but with an exclamation point at the beginning, such as ![MyDatabase.Sheet1.0.Firstname]. Now click Insert. This conditional test will hide the paragraph whenever the specified field is blank.
“The process for fixing blank lines is several steps, but can be done quickly. In the front is the hidden paragraph function insert dialog; in the background you can see where the paragraphs are denoted by toggling Nonprinting Characters in the View menu.”
You do have to repeat this process for each field you need to suppress — though it probably won’t be all; most likely candidates for missing lines are the optional “Address Line 2” or “Country” which are not necessarily present in every address. But whenever you’ve finished setting up your conditions, click on the “Synchronize Labels” button that floats in its own window, and your changes will be propagated to the entire document.
If you have trouble with this process, consult the OpenOffice users’ manual. It is a bit tedious, and hopefully will become a built-in feature in some future release, but it is easy enough to fix for now.
A considerably faster alternative to this process, however, is to use the custom-built label and business card templates provided at the Worldlabel Web site. The Worldlabel templates are built using OpenOffice Writer tables, and as a result do not suffere from the blank-line-suppression problem that the built-in wizard’s label sheets introduce. The files are OpenOffice Template (.OTT) format, and are cross-referenced by the Avery code number they fit. They are public domain, so they are free to use for any purpose. Read this howto on using these and customizing these templates.
Conclusion
The mail merge functionality built in to Writer is particularly nice due to the wide variety of database sources it supports. It can automatically tie in to address books like Thunderbird’s, KDE’s, or an office-wide LDAP directory, which saves you the trouble of manually updating the addresses. For repeat label sets, it is a good idea to save your work as an OpenOffice Template file, rather than as a saved document. This allows you to update the label information from the database automatically each time you make a new document.
Finally, if you are of the more right-brained persuasion, you may still prefer to work in Inkscape or Scribus to due the visual design work on your label or business card. But don’t overlook the time that OpenOffice can save you on the heavy listing: pulling address information in automatically. It is all free software, so you can do both. OpenOffice’s label printing features make a good time-saving complement to the other apps in a busy office environment.
BY NATHAN WILLIS
Resources:
Mail Merge and Openoffice.org tutorial by Solveig Haugland
Create Labels with Openoffice howto at Tutorials for Openoffice.org


Why not just have a built in label program that would create it’s own data base. In the data base portion you put in name, address, city, state, zip, country, etc. Then in the label part, you select which label you are using (for instance Avery; {a pick list pops up so you can select which label number you want…for instance 5160}). Then a pop up list of the database comes up allowing you to select which names you want to print on the label. It could even have a select all box.
Maybe such a free program already exists. If it does, I have not found it yet.